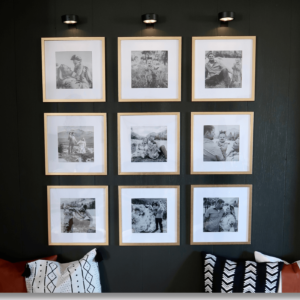
In this post, I will be showing you how to create a beautiful picture ledge using only thrifted frames. In fact, I saved over $40.00 just by using thrifted frames! I wanted a picture ledge above my couch, but I did not want to spend a ton of money on frames. I decided to thrift them! Not only is this a budget-friendly option, but it also allows you to add a unique and personal touch to your home decor and showcase your family’s treasured memories.

Step 1: Collecting the frames
The first step in creating your picture ledge is to collect a variety of thrifted frames. You can find these at thrift stores, garage sales, and even online marketplaces. When collecting your frames, it’s important to keep in mind the overall look and feel you want for your picture ledge. You can choose frames of different sizes, shapes, and styles to create a visually interesting display.

I purchased each of these frames (except for the gold one) for only $2.00. In total for the picture ledge, I only spent $16.00!
Here is a breakdown of how much I roughly saved by thrifting the frames for a TOTAL SAVINGS OF $45.95!
| Frame Size and Quantity | Thrifted Price | Retail Price |
| Three 11×14 frames | $6.00 | $14.99 |
| Two 8×10 frames | $4.00 | $11.99 |
| Two 16×20 frames | $4.00 | $29.99 |
| One 5×7 frame | $2.00 | $4.98 |
| TOTAL | $16.00 | $61.95 |
Wowza! I couldn’t believe how much I saved by thrifting the frames. They were all in pretty good condition, too!
I decided to look for frames in three different finishes – black, gold, and light wood. I also wanted to make sure that I had a variety of sizes. Here’s a video of me explaining the process I took.
Step 2: Cleaning and prepare the frames
Before you start to assemble your picture ledge, it’s important to clean and prepare your frames. This will ensure that they look their best once they are on display. Use a damp cloth to wipe down the frames, and remove any old backing or glass. If necessary, you can also paint or distress the frames to give them a more cohesive look.
Be careful though! While I was working on of the frames I accidentally had a mishap and ended up breaking one of them. It wasn’t a big deal, I was able to use some extra plastic I had lying around to create a new piece, but it definitely the most glorious moment of this project.
Step 3: Assembling the picture ledge
Once your frames are clean and prepared, it’s time to assemble your picture ledge. You can use a variety of different methods to attach your frames to the wall. For example, you can use picture hanging wire and nails or screws, or you can use a picture ledge shelf. It’s important to measure and mark your wall beforehand to ensure that your frames are spaced and leveled correctly.
Step 4: Adding your photos
The final step is to add your photos or art prints to the frames. You can use family photos, vacation shots, or even art prints to personalize your picture ledge. You can mix and match different styles of photos or art prints, or you can choose a theme to tie the whole display together.

I recommend using a printing company like Mpix. They have extremely fast delivery, and their quality is great. I have also used Walmart for larger prints as they are less expensive than some others. I got a poster-sized print from Walmart for around $12.00.
I also decided to add a couple of art pieces. This print was inspired from an Etsy seller who uses song lyrics.
The flower one I made in Canva. Get creative and what makes you happy! I do recommend using a mixture of professional photos, candid photos, and artwork in your gallery.
Conclusion:
Creating a picture ledge using thrifted frames is a budget-friendly and personal way to add a unique touch to your home decor. With a little bit of creativity and some thrift store finds, you can create a beautiful and meaningful display that will be sure to impress.


Leave a Reply